How do I move money from my Centtrip account back into my bank account?
You can return funds to your bank account by making a payment from your Centtrip account
You can return funds to your bank account by making a payment from your Centtrip account. Here’s how:
1. Add your bank account as a new recipient in your Centtrip account
How do I create a payment recipient?
Which platform are you using?
To begin enjoying fast, secure and cost-effective domestic and international payments, first you need to create your Centtrip list of suppliers and payees. You can do this quickly and easily by adding them to your Recipients list, either individually on an ad hoc basis, or in batch.
.png)
- Click ADD RECIPIENT and enter the account and payment details of your new payee into the form.
- Note - you must select the currency you intend to make payment(s) to this recipient in. To send payments in another currency, please set up your recipient for each currency.
- You will need to verify your new recipient as a Trusted Payee. Select your preferred verification method from the dropdown; Email or Mobile App.
- Follow on-screen instructions to enter your app or email generated security code and 'SUBMIT'.
What are the validation requirements?
Recipient Name
Initials -
Full names are required; recipients which have only an initial in the first name or last name field for individuals will not be accepted. Each name field must contain at least one full name part
Examples:*
| First Name | Last Name | Accepted? |
|---|---|---|
| Joe | B. | NO |
| J. | Bloggs | NO |
| Joe | Bloggs | YES |
| Joe M. | Bloggs | YES |
| Joe | M. Bloggs | YES |
* This applies only for beneficiaries of type 'individual'.
Numeric Characters -
Individual's names should not include any numbers. Company names can include numbers, but should not be made up entirely of numbers.
Examples:
| First Name | Last Name | Accepted? |
|---|---|---|
| Joe | 12B | NO |
| J121 | Bloggs | NO |
| Joe | Bloggs | YES |
| Joe M. | Bloggs | YES |
| Joe | M. Bloggs | YES |
| Company Name | Accepted? |
|---|---|
| 12345678 | NO |
| Acme 12 Ltd | YES |
Company Signifiers -
Company signifiers (e.g. Ltd, Inc, SA, GMBH etc.) must not be included in the Last Name field for individual recipients.
Example:
| First Name | Last Name | Accepted? |
|---|---|---|
| Joe | Bloggs Ltd. | NO |
| Joe | Bloggs Inc. | NO |
Recipient Address Details
The beneficiary address fields should not be populated with only numeric characters:
| Address | State/Province | City | Accepted? |
|---|---|---|---|
| 12 Acme Road | 123456 | 34235 | NO |
| 12 Acme Road | 123456 | LASD1415352 | NO |
| 123424 | Illinois | LASD1415352 | NO |
| 12 Acme Road | Illinois | LASD1415352 | YES |
| 12 Acme Road | Illinois | Chicago | YES |
Before making a payment to a recipient in your Centtrip account, please check that these requirements are met. If not, you can vist Add Recipient and set your beneficiary up as a new recipient.
How do I create recipients in batch?
Save time when adding multiple payment recipients to your Centtrip account. Our batch upload feature enables you to add hundreds of recipients in just one click, removing the need to create and verify each one individually.

- After signing into your account, visit the Recipients tab and click 'UPLOAD RECIPIENTS'.
- Scroll down and click either 'EXCEL TEMPLATE' or 'CSV TEMPLATE' to download the 'RecipientUploadTemplate’.
- Complete all relevant fields of the template for each recipient.
- Save your file and visit the same 'UPLOAD RECIPIENTS' page of your account (step 1).
- Follow the steps under 'Verify as Trusted Payee' to verify using either an App or email generated code.
- Click 'PICK A FILE...' and select your saved recipient template to upload it.
- Once processed, you will receive an on-screen notification confirming the number of successful/unsuccessful beneficiary uploads. Press 'OK' to view the details.
- Download the file provided - this will contain any unsuccessful recipients, along with the error reason. Example below:

- Correct the errors on this document and follow step 5 onwards to re-upload it in the same way.
- Once complete, you can make individual payments OR send payments in batch.
Hints & Tips
- You only need to re-upload the unsuccessful recipients, all others will have been processed successfully.
- 'Verify as Trusted Payee' - when entering the first 4 digits of the new recipient’s Account Number or IBAN, please use the details of the first recipient in the batch.
- The ‘Override’ field of the template can be used to update the details of an existing beneficiary; enter ‘Y’ into the row and the recipient (with the same nickname) will be updated accordingly.
How to complete your template
When completing your 'RecipientUploadTemplate', each recipient must occupy one row and all relevant fields must be filled accordingly. Information on how and which fields to complete is provided below:
Mandatory Fields
| Column | Field | Additional information |
|---|---|---|
| A | ‘Nickname’ | Each recipient has a ‘Nickname’ which is used to make payments going forward. Nicknames do not affect payment details and can be in the form of a code, name or any text/numbers that you can use to identify each recipient. |
| B | ‘CountryCode’ | The two-letter country code of the recipients bank. |
| C | ‘CurrencyCode’ | The three-letter currency code of the recipient's bank. |
| D and E, or F | ‘FirstName’ & ‘LastName’ OR ‘CompanyName’ | Each beneficiary must be set up as either an Individual or Corporate entity. On the template you must enter either the ‘FirstName’ & ‘LastName’ OR ‘CompanyName’. |
| I | ‘Address1’ | Beneficiary address - can use country code. |
| J | ‘Address2’ | Beneficiary address - can use country code. |
| K | ‘City’ | Beneficiary address - can use country code. |
| L | 'Postcode’ | Beneficiary postcode - can be '0000'. |
| M | 'State’ (if appliable) | Always required for countries which have states. |
| N-S | Bank Account Details | Only two out of the six bank account fields need to be completed for each recipient. The combination depends on the Bank Location and the Payment Currency; use the table below to determine which details are required. |
Which bank account details are required?
In the table below, reference the Beneficiary Bank Location and the Payment Currency to determine which two out of the six bank detail fields are required for each recipient. You can leave the other fields blank.
| Beneficiary Bank Location | Payment Currency | Unique Identifier Required | Bank Code Required |
|---|---|---|---|
| United States | USD | Account Number | ABA (9 digits) |
| United States | GBP | Account Number | SWIFT/BIC |
| United States | EUR | Account Number | ABA (9 digits) |
| Europe | USD | IBAN | SWIFT/BIC |
| Europe | GBP | IBAN | SWIFT/BIC |
| Europe | EUR | IBAN | SWIFT/BIC |
| United Kingdom | USD | IBAN | SWIFT/BIC |
| United Kingdom | GBP | Account Number | Sort-code |
| United Kingdom | EUR | IBAN | SWIFT/BIC |
| Asia | All currencies | Account Number | SWIFT/BIC |
| Africa | All currencies | Account Number | SWIFT/BIC |
| South America | All currencies | Account Number | SWIFT/BIC |
| Australasia | All currencies | Account Number | SWIFT/BIC |
| Canada | All currencies | Account Number | SWIFT/BIC |
| Antarctica | All currencies | Account Number | SWIFT/BIC |
Hints and tips
- If you can't see the country/currency combination you need and aren't sure which bank details you need to provide, visit the main Recipient tab of your account and select the required currency and country - the necessary fields will be displayed there.
- The ‘Override’ field can be used to update the details of an existing beneficiary; enter ‘Y’ into the row and the recipient (with the same nickname) will be updated accordingly.
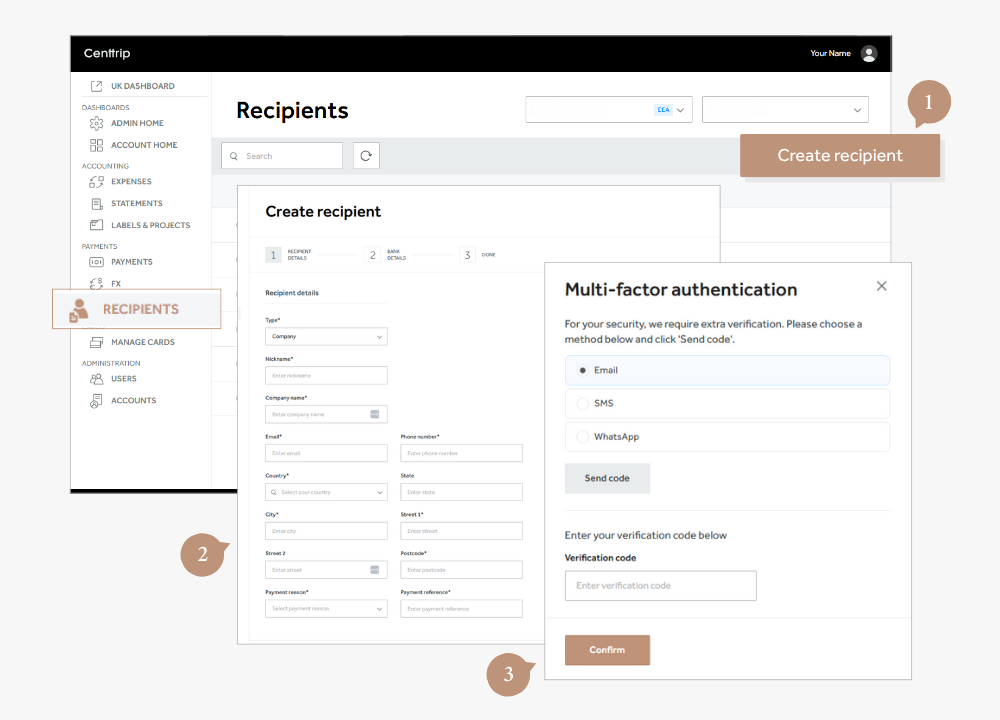
- Open the Recipients Section - from the left-hand menu, select Recipients, then click the Add Recipient button on the right.
- Enter Recipient Information - follow the on-screen steps to fill in the required recipient details. Click Next to proceed through each step.
- Complete Multi-Factor Authentication - to verify the recipient's creation, complete the authentication process by choosing your preferred method: Email, SMS, or WhatsApp. Enter the verification code sent to you and click Confirm to finish.
2. If required, convert your funds into the same currency as your bank account
How do I convert currency?
Get direct access to the live currency market via your desktop account and the app. Purchase currency at transparent, competitive rates to send to your Centtrip account, load to your Centtrip card(s) or make a payment
Which Centtrip Platform are you using?
Convert currency within your desktop account
Watch this 2-minute video:
Follow these steps:
- Select the currency you would like to convert from, and the currency you would like to purchase.
- Enter an amount in either the Convert From or Convert To box.
-
Select how you would like to pay -
- Centtrip Account - use funds held on your Centtrip account;
- Centtrip Card - Use funds from one of your Centtrip cards, or;
- Bank Account - Make a transfer from your corporate bank account
-
Choose where to send purchased currency -
- Centtrip Account - load it to your Centtrip account;
- Centtrip Card - transfer it to one of your Centtrip cards, or;
- Bank Account - use it to make a payment to one of your recipients.
- Click 'GET RATE' to view the live exchange rate and then 'CONFIRM' to complete.

Get a quick walkthrough:
Sign into your account and then click here for a quick tutorial (you must be signed in first).
Convert currency within the app
- Sign into the app and tap 'Convert Currency'
- Choose where you would like to send your purchased currency; 'My Account', 'Recipient', or 'My Card'. Then press 'NEXT'.
- Select the currencies you would like to convert from and to, and tap 'NEXT'.
- Review the live rate, enter the amount, and press 'NEXT'.

- Access the conversion page - from the left-hand menu, go to the FX section. Use the dropdown boxes to select the account you want to convert funds from.
-
Enter conversion details - use the two dropdowns to select the currency you want to convert from, and to. Then, enter either:
- The amount you want to sell (e.g., if you have £12,000 GBP to convert to EUR, enter this in the Sell box), OR;
- The amount you want to buy (e.g., if you need exactly €12,000 EUR, enter this in the Buy box). You do not need to input both.
- Click Get Rate - view the live market rate, before and after account balances, and the conversion amount. (Note: The exchange rate is live and will need to be refreshed every 30 seconds.)
- Confirm the conversion - if happy with the details, click Confirm to complete the currency conversion.
You can now use the converted funds for international payments, transfers to other accounts, or to fund your Centtrip cards.
Access the Payments & FX page
In order to make domestic or international payments, you need to first ensure you have access to our Payments & FX Services.
- Sign into your account and click on PAYMENTS in the left hand menu
- Switch to Single Payment at the top.
- Click GO TO PAYMENTS PLATFORM - if you see an error rather than the screen below, please contact your Administrator or help@centtrip.com to request access.

Convert Currency
i. Get a quote and convert instantly
- Enter the currencies and amount you want to convert into the 'QUICK QUOTE' box.
- Choose a Delivery Type and click ‘Get a Quote’.
- Review your rate and if happy, click ‘Buy’ to purchase the currency.
ii. Choose where to send your currency
Use the ‘Beneficiary’ / ‘Place in Holding’ toggle to choose whether to make a payment with your purchased currency, or to send it to your holding account for a future payment.
- Pay a beneficiary – click on the ‘Beneficiary’ dropdown and either select an existing payee, or click ‘Add new beneficiary’ and enter the relevant payment details. Click ‘Add another payment’ and select another beneficiary if you want to make multiple payments.
- Place in holding – funds will be sent to your foreign exchange holding accounts, which are separate to your USD Centtrip account.
Click ‘Continue’ when ready.
iii. Select a payment method
- Direct Debit is the default payment method, and enables you to pay for your currency without having to sign into a separate bank account and make a transfer. However, you can change this to a wire payment if required.
Make a Payment
- Select 'Holding Accounts' to view your balances in each currency.
- Locate the currency you want to use for payment, and select 'Send Payment' under 'Actions'.
- Enter the payment 'Amount'
- Click on the ‘Beneficiary’ dropdown - select an existing payee, or ‘Add new beneficiary’.
- Enter a 'Value Date' (i.e. the date payment should be sent).
- Add your 'Payment Reference', such as an invoice.
- If you need to make multiple payments, click 'Add another payment'.
- Click 'Continue', then 'Complete Your Payment'.
Check a Payment Status
Select 'Reports', and then 'Payment Tracker' Locate your payment and check the 'Status' column.
Payment Status Definitions -
- Initiated – payment has been submitted by an administrator on your account.
- Funded – funds have been debited from your bank account / holding account.
- Sent – payment has been sent and is on the way to your beneficiary / holding account, as per your instruction.
- Delivered – currency has now been credited to the relevant account.
Move funds from your FX holding accounts to your USA Centtrip account and cards
**NOTE - this is only applicable to clients with an account on our USA Platform. How can I check this?
How to move USD Funds
- Sign into your account and click on PAYMENTS in the left hand menu. Then, switch to Single Payment at the top.
- Click GO TO PAYMENTS PLATFORM
- Click 'Holding Accounts' to view your balance in each currency.
- Locate your USD balance and select 'Send Payment' under 'Actions'.
- Enter the 'Amount' you want to transfer.
- Click on the ‘Beneficiary’ dropdown and select your own corporate bank account (or 'Add new beneficiary' to set up).
- Enter a 'Value Date' (the date payment should be sent) and payment reference
- Click Continue, and then 'Complete Your Payment'.
- Once payment has been received, you can transfer funds to your Centtrip account.
- Funds will be available to cards which spend from the shared balance, and you can transfer funds to your pre-load cards.
How to move non-USD Funds
Your Centtrip account can only hold funds in USD, so any other currencies will need to be converted before you can transfer them to your account.
- Sign into your account and click on PAYMENTS in the left hand menu. Then, switch to Single Payment at the top.
- Click GO TO PAYMENTS PLATFORM. Click: 'Send Payment'
- Select USD under 'Currency To Pay' and the non-USD currency under 'Currency I have'.
- Enter the 'Amount' you want to convert from your holding account.
- Click ‘Beneficiary’ and select your corporate bank account (or 'Add new beneficiary' to set up).
- Enter a 'Value Date' (the date payment should be sent) and a reference, then 'Continue'
- Review the conversion quote and click 'Buy' to proceed.
- Tick 'Use Operating account to fund'. Then, 'Complete Your Payment'
- Once payment has been received, you can transfer funds to your Centtrip account.
- Funds will be available to cards which spend from the shared balance, and you can transfer funds to your pre-load cards.
3. Send the payment to your bank account
How do I make a payment?
Which Centtrip platform are you using?
Make secure and cost effective payments within seconds and without limits. We tailor our services to your unique needs, whether that’s individual, ad hoc payments or regular, batch payments to suppliers or employees; domestically or internationally.
Using your desktop account:
Step 1
.png)
Sign into your account. If you already hold the payment currency on your Centtrip account, select ‘Send Payments’. Otherwise, please visit Buy Currency to convert the required amount first.
Step 2
%20(4).png)
Select your payment currency and enter the amount.
Step 3
%20(4).png)
Choose whether you would like to pay using funds held on your Centtrip account, or one of your cards. Leave the ‘To’ field as ‘Bank Account’.
Step 4
%20(4).png)
In the next four fields, select the payment recipient, enter a custom reference, choose a payment reason and check or edit the recipient email address. A confirmation will be sent to yourself, as well as the recipient email. If your payment recipient has not yet been set up, follow these steps.
Step 5
%20(2).png)
Check the details are all correct and click ‘CONFIRM’ to process your payment. This can take several days depending on the currency, value and time submitted.
Quick Tutorial
Step-by-Step Guide
- Go to the PAYMENTS screen from the left-hand menu and select the Single Payment tab. (You can also make batch payments under the Create Batch Payment tab.)
- Select the Corporate and Operating Account you want to send the payment from.
- If the recipient hasn’t been set up yet, click Create Recipient and follow the steps to add them.
- Fill out the payment details in the online form. Click Confirm to review the payment summary and complete the transaction.

Access the Payments & FX page
In order to make domestic or international payments, you need to first ensure you have access to our Payments & FX Services.
- Sign into your account and click on PAYMENTS in the left hand menu
- Switch to Single Payment at the top.
- Click GO TO PAYMENTS PLATFORM - if you see an error rather than the screen below, please contact your Administrator or help@centtrip.com to request access.
Convert Currency
i. Get a quote and convert instantly
- Enter the currencies and amount you want to convert into the 'QUICK QUOTE' box.
- Choose a Delivery Type and click ‘Get a Quote’.
- Review your rate and if happy, click ‘Buy’ to purchase the currency.
ii. Choose where to send your currency
Use the ‘Beneficiary’ / ‘Place in Holding’ toggle to choose whether to make a payment with your purchased currency, or to send it to your holding account for a future payment.
- Pay a beneficiary – click on the ‘Beneficiary’ dropdown and either select an existing payee, or click ‘Add new beneficiary’ and enter the relevant payment details. Click ‘Add another payment’ and select another beneficiary if you want to make multiple payments.
- Place in holding – funds will be sent to your foreign exchange holding accounts, which are separate to your USD Centtrip account.
Click ‘Continue’ when ready.
iii. Select a payment method
- Direct Debit is the default payment method, and enables you to pay for your currency without having to sign into a separate bank account and make a transfer. However, you can change this to a wire payment if required.
Make a Payment
- Select 'Holding Accounts' to view your balances in each currency.
- Locate the currency you want to use for payment, and select 'Send Payment' under 'Actions'.
- Enter the payment 'Amount'
- Click on the ‘Beneficiary’ dropdown - select an existing payee, or ‘Add new beneficiary’.
- Enter a 'Value Date' (i.e. the date payment should be sent).
- Add your 'Payment Reference', such as an invoice.
- If you need to make multiple payments, click 'Add another payment'.
- Click 'Continue', then 'Complete Your Payment'.
Check a Payment Status
Select 'Reports', and then 'Payment Tracker' Locate your payment and check the 'Status' column.
Payment Status Definitions -
- Initiated – payment has been submitted by an administrator on your account.
- Funded – funds have been debited from your bank account / holding account.
- Sent – payment has been sent and is on the way to your beneficiary / holding account, as per your instruction.
- Delivered – currency has now been credited to the relevant account.
Move funds from your FX holding accounts to your USA Centtrip account and cards
**NOTE - this is only applicable to clients with an account on our USA Platform. How can I check this?
How to move USD Funds
- Sign into your account and click on PAYMENTS in the left hand menu. Then, switch to Single Payment at the top.
- Click GO TO PAYMENTS PLATFORM
- Click 'Holding Accounts' to view your balance in each currency.
- Locate your USD balance and select 'Send Payment' under 'Actions'.
- Enter the 'Amount' you want to transfer.
- Click on the ‘Beneficiary’ dropdown and select your own corporate bank account (or 'Add new beneficiary' to set up).
- Enter a 'Value Date' (the date payment should be sent) and payment reference
- Click Continue, and then 'Complete Your Payment'.
- Once payment has been received, you can transfer funds to your Centtrip account.
- Funds will be available to cards which spend from the shared balance, and you can transfer funds to your pre-load cards.
How to move non-USD Funds
Your Centtrip account can only hold funds in USD, so any other currencies will need to be converted before you can transfer them to your account.
- Sign into your account and click on PAYMENTS in the left hand menu. Then, switch to Single Payment at the top.
- Click GO TO PAYMENTS PLATFORM. Click: 'Send Payment'
- Select USD under 'Currency To Pay' and the non-USD currency under 'Currency I have'.
- Enter the 'Amount' you want to convert from your holding account.
- Click ‘Beneficiary’ and select your corporate bank account (or 'Add new beneficiary' to set up).
- Enter a 'Value Date' (the date payment should be sent) and a reference, then 'Continue'
- Review the conversion quote and click 'Buy' to proceed.
- Tick 'Use Operating account to fund'. Then, 'Complete Your Payment'
- Once payment has been received, you can transfer funds to your Centtrip account.
- Funds will be available to cards which spend from the shared balance, and you can transfer funds to your pre-load cards.